

Outdoor Paving Tiles OEM: Your Guide to Custom Manufacturing
2026-11-16
Ever received a container of outdoor tiles that looked nothing like the approved sample? You're not alone. OEM custom manufacturing for paving tiles is full of avoidable pitfalls—unless you know exactly what to specify. This guide walks through the decisions that matter: raw material blends, pressing methods, thickness, slip ratings, and custom finishes. With Beata Ceramics, those specs become a production checklist, not a wish list.
Why Standard Pavers Fall Short for Ambitious Outdoor Projects
Most off-the-shelf pavers are designed for the middle of the bell curve: a backyard patio, a simple walkway, maybe a modest driveway. They're engineered to a price point that assumes average traffic, average weather, and average expectations. But when you start mapping out a rooftop lounge with a built-in fire feature, or a winding garden path that has to survive frost heave and relentless sun, those familiar concrete blocks reveal their limits fast. Their uniform thickness and shallow interlock might look fine on a sales sheet, yet under real stress they shift, crack, or fade into a patchy mess within a couple of seasons.
Then there's the aesthetic ceiling. Standard pavers come in a handful of muted tones and repetitive shapes that make every project feel like a clone of the last one. Ambitious outdoor spaces demand texture, irregular edges, and color variation that responds to the setting—think limestone hues that mirror local stone or a herringbone pattern broken by bands of contrasting aggregate. Generic options simply can't deliver that. Worse, their manufacturing tolerances are loose enough that gaps appear between joints, inviting weeds and undermining the whole surface after the first freeze-thaw cycle.
The real deal-breaker, though, is load-bearing and drainage. A heavy outdoor kitchen island, a cantilevered bench, or even a crowd of guests can exceed what a thin, low-density paver was ever meant to hold. Standard units often rely on a sand bed that washes out in heavy rain, leading to settling and tilted edges. For projects that need to handle water runoff creatively—permeable layouts, subtle swales, or clean transitions to planting beds—mass-market pavers simply weren't thought through that far. You're left either overbuilding the base (and still paying for mediocre surface quality) or accepting that your grand vision will look tired before the first anniversary.
The Hidden Engineering Behind Weather-Resistant Custom Tiles
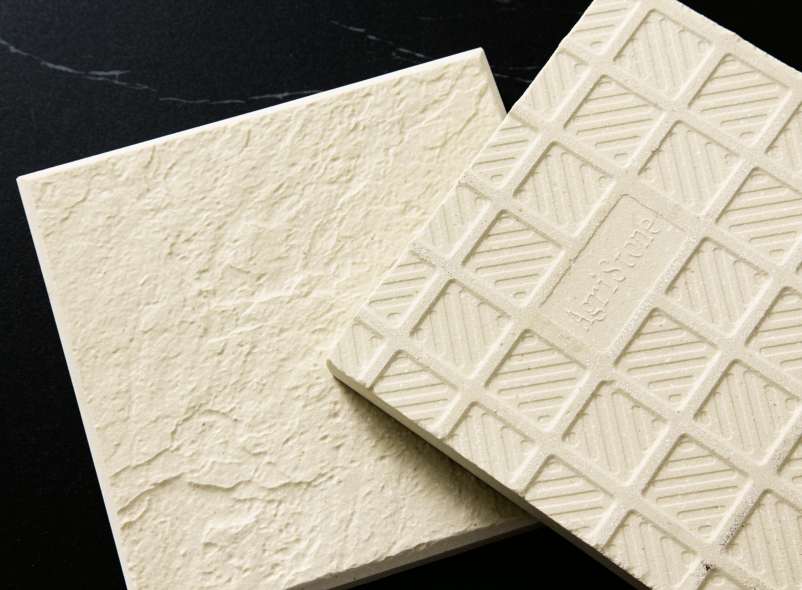
Most people assume weather resistance comes down to a thicker glaze or a denser surface, but the real work happens long before the tile ever sees a kiln shelf. Custom tile makers adjust clay body recipes and firing schedules to fit a specific climate, not a generic standard. The goal is controlled porosity—low enough to keep water from soaking in, yet open enough to let trapped vapor escape without popping the surface during a freeze cycle. A tile that simply blocks all moisture often fails sooner than one that knows how to breathe.
Edge geometry plays an equally quiet role. You rarely notice it until a storm exposes the difference. Hidden weep channels, slight back-bevels, and tight but flexible interlocking profiles let water drain away instead of pooling where it can cause spalling. The coefficient of thermal expansion is also matched to the setting bed, so the tile and substrate move together rather than shearing apart over years of hot days and cold nights.
Surface engineering is the final layer of defense, and it is not about adding a shiny film. UV-stable pigments are blended through the entire wear layer, so colors do not fade unevenly after a few summers. Some custom lines use a matte crystalline finish that discourages algae and mildew without creating a slippery glaze. The result is a tile that ages slowly, hides its mechanical complexity, and lets the roof or facade do its job without constant intervention.
From Sketch to Site: What Actually Happens During OEM Production
The sketch that starts an OEM project rarely survives contact with tooling engineers. Before any mold is cut, the design goes through a manufacturability review where wall thickness, draft angles, and undercuts get questioned line by line. What looks clean on a render often needs added ribs for strength or a split line moved because the part simply won’t eject. Most clients are surprised how many small changes happen before prototyping even begins.
Tooling trials are where the timeline usually stretches. The first T0 samples come back with sink marks, flash, or parts that fit fine on the bench but bind once assembled with other components. Each correction means another round of polishing, welding, or adjusting injection parameters. It’s not unusual to go through three or four sample rounds, and sometimes a supposedly minor tweak in the CAD forces a partial modification of the mold steel.
Even after samples are approved, full production doesn’t start overnight. A pilot run exposes issues with line speed, fixture alignment, and packaging that never appeared in the lab. The real test comes on site, where installers find the building’s conditions don’t match the drawings — anchor points shifted, floors out of level, or seams that look worse under natural light. OEM engineers often stay through the first installation batch to close these gaps before the product ships in volume.
Material Mixes That Make or Break a Commercial Installation
Choosing the right combination of substrates, adhesives, and finishing layers is often the quiet determinant of whether a commercial flooring job holds up under real-world traffic. Vinyl plank over uneven concrete, for example, looks flawless on day one but telegraphs every subfloor flaw within weeks. Pairing a rigid core product with a self-leveling underlayment changes that equation entirely, absorbing micro-deflections that would otherwise crack seams or telegraph through the wear layer. The difference rarely shows up in a product sample—it appears only after months of rolling carts and footfall.
Similarly, mixing manufacturer systems can unravel even the most carefully spec’d project. An adhesive rated for one brand of luxury vinyl tile may soften a different manufacturer’s backing, leading to oozing at the joints or edge curling. The same principle applies to wall bases and transitions: a rubber reducer strip that works beautifully next to carpet can look clumsy against a polished concrete transition if the color temperatures clash or the profiles don't align. Successful installers treat the material stack not as a list of individual products but as a single, interdependent system where moisture barriers, patching compounds, and primers all speak the same chemical language.
Cost-driven substitutions often introduce the most risk. Swapping a specified high-solids moisture barrier for a budget water-based sealer might pass a quick visual check but fail when hydrostatic pressure spikes after a rainy season. Likewise, a fast-curing patch that saves a day on the schedule can shrink differently than the surrounding floor, leaving ghost lines that show through sheet vinyl. The installations that endure are the ones where every layer—from slab to surface—was selected not just for price or speed, but for how it behaves next to its neighbors under load, heat, and humidity.
Color, Texture, and Edge Profiles Most Makers Won't Offer
Standard catalogs stop at espresso and oak, but a handful of shops still mix custom tint bases to hit colors like burnt umber, oxidized copper, or the faint green cast of reclaimed teak. These aren't one-coat stains either—they're layered by hand, sanded back, and sealed so the grain shifts under different light.
Texture is where the difference gets harder to fake. Instead of a uniform brush pass, some makers use a combination of wire wheeling, hand scraping, and low-pressure media blasting to create a surface that catches your fingers before your eyes. The edge profile gets the same attention: a slightly pillowed top edge, a chamfer that follows the grain instead of the board, or a micro-bevel so subtle it reads as a shadow line rather than a cut. Most production lines won't touch that level of variation because it slows the line and ruins repeatability—which is exactly why it feels like it was made for the room, not just assembled for it.
Ordering Smart: Lead Times, Minimums, and Cost Traps to Avoid
A supplier's lead time is a promise with fine print. When a factory says four to six weeks, they're counting from the moment your deposit clears and materials hit their floor—not from the day you sign the quote. Add port delays, inspection backlogs, and a holiday shutdown nobody mentioned, and that six-week cushion becomes a ten-week scramble. The fix isn't chasing faster shipping after the fact; it's padding your own schedule by at least a third and checking the factory's production calendar before you commit.
Minimum order quantities can feel like a gatekeeping fee for small buyers, but they're really a signal about where a supplier makes their margin. If the MOQ is triple your realistic sales volume, you're not getting a deal—you're subsidizing the factory's setup costs with boxes that will gather dust. Ask what makes the number move: sometimes a slight tweak in color, size, or packaging drops the minimum because it lets the supplier run your order alongside a bigger client's production.
The cost trap that catches most people isn't the obvious one like a 15% price hike—it's the quiet erosion. Tooling fees billed as "one-time," storage charges that start after 30 days, or unit prices that only hold if you reorder within a quarter. Before comparing quotes, list the full cash outlay over twelve months, including freight, duties, and the cost of capital tied up in inventory. A higher per-unit price with no hidden fees usually beats a lowball quote that nickel-and-dimes you into regret.
FAQ
In paving tile manufacturing, OEM refers to a factory producing tiles according to another company's specifications. That company then sells them under its own brand. It lets you offer unique products without owning production equipment.
You can usually adjust dimensions, thickness, surface texture, color, and edge finishing. Some manufacturers also offer custom blends, special aggregates, or even embedded patterns. The level of flexibility depends on the factory's equipment and willingness to accommodate small runs.
It starts with a clear brief: drawings, samples, or reference images. The factory then produces a prototype or small batch for approval. Once you sign off, mass production begins. Lead times vary, but expect anywhere from four to ten weeks depending on complexity and capacity.
Porcelain, concrete, and natural stone are the main options. Porcelain offers high strength and low water absorption, concrete is budget-friendly and highly customizable, while natural stone delivers a premium look but with more variation and maintenance.
It varies greatly. Some factories accept 500 square meters per design; others require 1,000 or more. Custom colors or textures can push MOQs higher because of setup costs and raw material batches.
Request physical samples before full production, ask for test reports like slip resistance or frost resistance, and clarify tolerance limits. If possible, hire a third-party inspection service during production and before shipment.
Tooling or mold fees, prototype sampling charges, packaging design, and freight can add up quickly. Also consider potential rework if the initial sample doesn't match expectations. Always get a detailed quotation that separates these items from the unit price.
Look for a factory with proven experience in the specific material you want. Ask for references or case studies, visit the facility if feasible, and test their responsiveness. A good partner asks clarifying questions rather than just agreeing to everything.
Conclusion
Most stock pavers are pressed to hit a price point, not to survive a coastal freeze-thaw cycle or a high-traffic hotel plaza. That's why custom Outdoor Paving Tiles OEM work starts with admitting standard units underperform: they warp, fade unevenly, and arrive with enough dimensional drift to wreck sightlines. The real engineering sits in the mix and cure, not the mold. Weather-resistant tiles rely on low-absorption aggregates, carefully dosed polymers, and a controlled curing window that most off-the-shelf factories skip. During OEM production, expect an actual process: your drawings get translated into CNC-machined molds, then pilot batches are tested for compressive strength, slip resistance, and color stability before a full run. If the material mix isn't tuned for the site's load, drainage, and salt exposure, even a beautiful paver fails within two seasons.
The options that actually separate a custom job live in the details. Color blending shouldn't come from a printed catalog; it should come from fired samples matched to your project's concrete, stone, or landscape palette. Textures need to offer wet-slip performance without becoming a cleaning nightmare, and edge profiles like a crisp 2mm chamfer or a soft bullnose change how joints read from ten meters away. Ordering smart is where money gets saved or burned. Lead times typically run six to fourteen weeks once tooling is approved, and minimums can swing from a few hundred to several thousand square meters depending on the factory. Watch for hidden line items: mold amortization, palletized freight class, and color-match rework. Insist on a physical pre-production sample and a written tolerance band for size and shade—otherwise you're buying a very expensive guess.
Contact Us
Contact Person: Emma
Email: [email protected]
Tel/WhatsApp: 8618064423698
Website: https://www.beataceramics.com/