

Bulk Flood Control Ton Bags for Faster Emergency Flood Barriers
2026-11-19
When floodwater is already moving, every minute spent filling sandbags works against you. Bulk flood control ton bags change that math by making faster emergency flood barriers possible without heavy equipment or large crews. At Jianghe Flood Prevention, we've watched these tough, flexible bags become the first line of defense in storms, flash floods, and levee breaches. This guide breaks down what actually matters when you need containment that holds.
The Speed Advantage of Bulk Ton Bags When Water Rises Fast
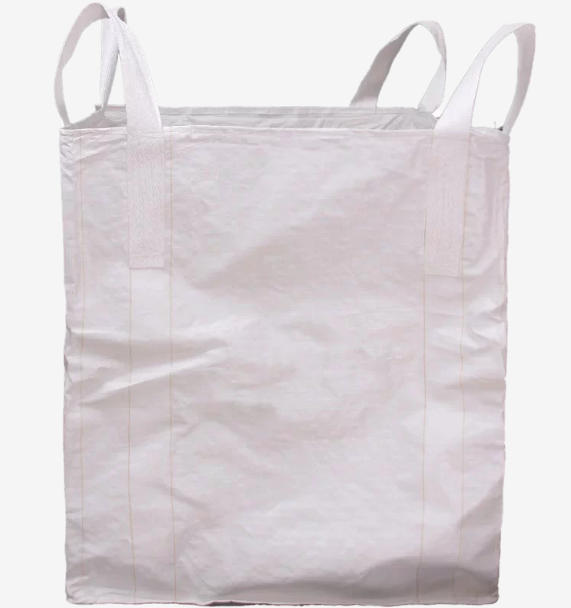
Flood response lives and dies by minutes. Bulk ton bags—those heavy-duty woven polypropylene sacks that can hold a cubic meter of sand or soil—can be filled and moved far faster than traditional sandbags when water is rising quickly. A single ton bag takes roughly the same time to fill as a dozen small sandbags, but it covers ground that would otherwise require fifty or more individual placements. That speed means a crew can close a breach or build a temporary barrier before the water spreads into streets, doorways, or critical infrastructure.
The real advantage shows in coordination. Instead of passing hundreds of small bags down a human chain, a loader drops one ton bag into a skip or onto a flatbed, and a forklift or excavator places it directly where the water is threatening. Fewer handoffs mean fewer dropped bags, fewer twisted backs, and less confusion in the dark or the rain. Emergency teams that have practiced this method can set a line of ton bags along a levee in under an hour—work that would tie up a larger crew for half a day using sandbags.
There is also a cascading effect. Because ton bags are faster to deploy, teams can move from one vulnerable point to the next before the situation degrades. A road that is still passable at 2 a.m. might be gone by 3 a.m.; losing ten minutes to fumbling with small bags can mean losing the whole route. Ton bags strip those ten minutes out of the cycle, letting responders stay ahead of the water rather than racing behind it.
Fill Materials That Make Emergency Barriers Hold Their Ground
Water is the most common fill for temporary barriers because crews can usually find a hydrant or a tanker truck nearby, and draining a plastic shell at the end of a job is straightforward. But water has a hidden flaw: in freezing weather it expands, cracks the shell, and turns a barrier into a brittle block that may fail exactly when it is needed. Some teams mix in salt brine or a non-toxic antifreeze to lower the freezing point, though that adds cost and complicates disposal if the barrier leaks.
Sand and crushed stone are a different tradeoff. They pack tighter, resist freezing, and add much more weight per gallon of internal volume, which keeps a barrier from shifting when it takes a glancing hit. The downside is labor: sand is slower to load and almost impossible to remove completely without shoveling, so it tends to stay in place for longer deployments where the extra ballast is worth the cleanup effort.
For barriers that need to stay put for months or survive a serious vehicle impact, flowable fill or lean concrete turns the cavity into a solid mass. Once cured, the barrier acts less like a movable piece of traffic control and more like a fixed barrier wall. That level of hold is reassuring, but it removes any future flexibility, so it is usually reserved for perimeter hardening, facility entrances, or other locations where relocation is not part of the plan.
Stacking Bulk Bags So Floodwater Meets a Wall, Not a Gap
Floodwater hunts for the easiest opening, and a bag wall with straight vertical joints gives it one. Stack each course so the middle of the bag above lands on the seam below, then stand on it and rock your weight side to side. That little bit of working settles the fill into the hollows and turns a row of rounded sacks into a tighter face.
At the ends and corners, don't simply drop another full bag and hope. Fold the bag's neck under itself or stuff the triangle between the stack and a wall with a tightly rolled half bag. Run a strap around the entire stack about knee height and again at the top, and pull until the bags creak. The pressure should squeeze the courses together, not just hold the outside skin.
Before you call the wall done, crouch at ground level and look along the wet side for daylight under the first course. Fill low spots with compacted fill or shove a folded bag into the gap from the dry side, then hammer it in with a piece of lumber. If the first course is sealed and every seam above it is broken, the water meets a wall instead of a path.
How to Pre-Stage Ton Bags for Minutes-Faster Deployment
Most of the delay with ton bags doesn’t happen during filling; it happens while someone opens a folded bag, untangles the lift loops, and figures out where the spout needs to sit. Pre-staging flips that order. Unbundle the bags ahead of time, give each one a hard shake to break the creases, and hang it from a spreader bar or heavy-duty stand at the fill point. Once the loops are hooked and the fill spout is tied off at the right height, the operator can start the flow immediately instead of spending the first few minutes untwisting fabric.
Place staged bags on pallets or low timber skids before filling when the filled bag will be moved by forklift. That single step keeps the bottom spout clear, reduces the chance of a snag, and gives the forks a clean entry path. For sites running more than one material, stage the empty bags in separate rows and mark each row with a colored tag or a chalk line on the floor. The point is to make the next bag obvious, not to write a procedure someone has to read while product is waiting.
Finally, treat the lifting equipment as part of the staging. Park the forklift or hoist close enough that the operator doesn’t have to walk back and forth, and preset the forks or hook spacing to match the bag loops before the first fill. Keep one empty bag within reach of the fill station, not stacked across the yard. These small setup choices usually cut two to five minutes from each bag change, and over a full day that becomes extra trucks loaded or extra material out the door.
Moving and Placing Bulk Barriers Without Wasting Precious Time
Most delays with bulk barriers come from poor staging, not slow hands. Parking a skid steer or forklift where the next stack sits ready, and walking the drop line once before any barrier leaves the truck, removes the usual stop-and-look pauses. Teams that treat the route like a short assembly line tend to finish long before crews that constantly double back.
Another time sink is over-handling. Instead of carrying each unit twice, use dollies, barrier carts, or a telehandler with a simple lifting bar to move several at once. Mark the final positions with chalk or small cones first, so operators never wait for someone to wave them into place. A clear hand signal or radio phrase for stop, lower, and release keeps the rhythm steady and avoids resetting units.
Finally, stage an extra ten percent near the middle of the run rather than at one end. This single change cuts walking distance and lets the crew work both directions when a truck blocks part of the path. Laying out the right lifting gear before the first barrier lands is cheap insurance against losing the schedule to small, avoidable delays.
Storage Checks That Keep Flood Control Ton Bags Ready to Go
Most storage damage on flood control ton bags starts where nobody looks—the underside. Run a hand along the bottom panel for grit, trapped moisture, or the faint dark streaks that signal water has wicked into the polypropylene. Even a small puncture from a gravel edge or a misplaced pallet nail can become a sidewall split once the bag is filled and moved under load.
How the bags are stacked matters just as much as the surface beneath them. Keep them on level, well-drained ground or on pallets that spread the weight without creating hard pressure points. If lower bags begin to bulge, lean, or show crease lines near the seams, the stack is too tall or uneven. Rotate older stock forward so time in the sun does not quietly break down the fabric before the bags are called into service.
Before storing or deploying, check the lifting loops and the stitching around them. Frayed loops and loose threads are not cosmetic flaws; they are where the bag lets go when it gets moved in a hurry. Setting aside damaged bags, marking questionable ones for repair, and keeping the storage area clear of sharp debris makes the difference between a stockpile that is ready and one that only looks ready.
FAQ
Each bag holds roughly a cubic yard of material, so a single lift replaces dozens of standard sandbags. With a loader or skid steer, a small crew can stack enough weight to form a continuous line in minutes instead of hours.
They work with gravel, crushed stone, clay, or even dry soil. Wet or muddy material also works as long as it can be closed inside the bag; the main thing is to avoid sharp debris that might cut the fabric.
Most models have a top spout or duffel-style flap that can be cinched with the built-in cords. You don't need perfect closure; fold the spout down and keep the open side facing the protected area so water pressure pushes against the closed base.
Their weight does most of the work. A standard one-ton bag filled with sand resists sliding because of friction between bags and ground. Staggering the joints, like brickwork, and setting the bottom course slightly into the ground improves stability.
One filled bag weighs around 1,800 to 2,200 pounds, so manual handling is not realistic. They are designed for quick placement with a loader, backhoe, crane, or forklift. The quick deployment comes from moving large mass in a single operation.
They don't need to be watertight. A small amount of seepage is normal and can be handled with a pump or a plastic sheet lapped over the upstream side. The goal is to create a heavy continuous wall that slows and redirects water, not a dry seal.
Standard polypropylene bags degrade under prolonged UV exposure, so outdoor storage should be covered or shaded. Many suppliers offer UV-treated fabric for longer outdoor life, but keeping them off the ground and away from rodents extends usable life more than anything.
Set the bags side by side with the long faces touching and overlap the top course halfway across the seam below. If possible, place a strip of plastic sheeting along the upstream face before stacking the second course. This cuts seepage and keeps the wall steadier.
Conclusion
When water climbs faster than crews can sandbag, bulk flood control ton bags change the math. Instead of filling dozens of small sacks, one properly staged bag can be dropped, filled, and moved into position within minutes. The real advantage comes from how little equipment and labor they demand: a loader or skid steer with a bag hook can handle what would otherwise take a full team. Fill material matters just as much as speed. Clean sand and crushed stone hold shape under pressure, while clay-heavy soil can clog drainage and make bags too heavy to adjust. Pre-staging bags near low-lying roads or creek crossings cuts response time further, turning a reactive scramble into a controlled routine.
Stacking decisions determine whether water meets a wall or a gap. Offset each layer like brickwork and keep the butt ends tight so pressure doesn't push a seam open. For taller barriers, step the base back slightly and fill bags only to about three-quarters capacity to keep them flexible enough to settle into place. Moving filled bulk barriers without wasting time means having chains, spreader bars, and bag hooks ready before the first drop of rain arrives. Storage checks are just as critical: inspect fabric for UV damage, clear out rodents, and replace any bag that feels brittle or shows broken stitching. A stockpile that survives the dry season intact is the one that actually works when the water shows up.
Contact Us
Contact Person: Kristin Zhang
Email: [email protected]
Tel/WhatsApp: +8615366239752
Website: https://www.jianghecn.com/